I have such a passion for the mountains and since becoming a full time professional photographer, have made it my aim to document, in all their beauty, some of the high peaks of Southern Africa. It is for this reason that I ascend to 3000m above sea level with an extra 5kg of weight on my back just to make sure I have my tripod and top quality camera gear on hand to capture the breathtaking imagery.
For those of you wanting to get into photographing the mountain from on high, below are a few tips and notes to bear in mind from the last 6 years of experience:
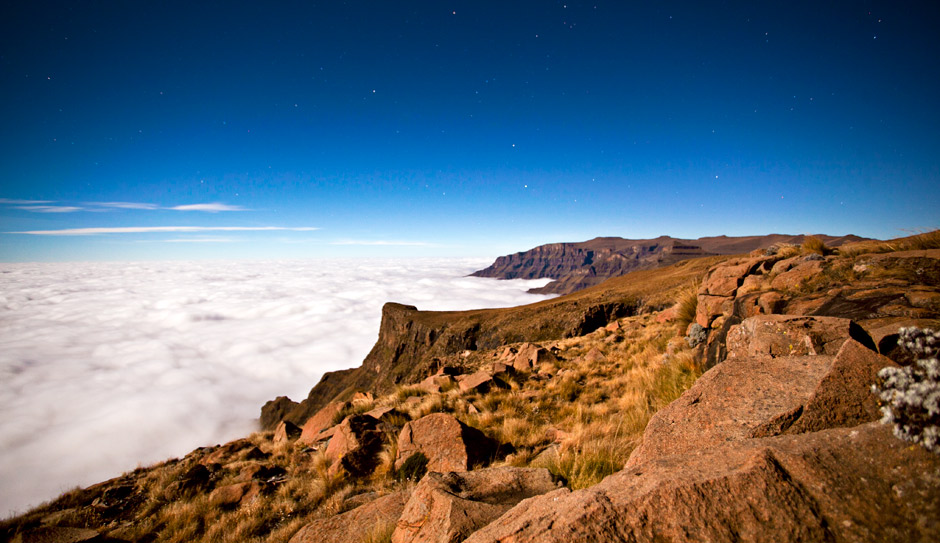
Choose the right time of the year. Depending on what kind of imagery you wish to achieve could determine your timing in planning the hike. Winter is known for more stable weather conditions in the Berg but the time around June and July can be quite brutal with temperature going down to as -10° C with high winds. But you’re almost guaranteed to get clear nights for beautiful star photography. In Summer it is much warmer but you need to be careful of the thunderstorms and torrential rains. If the weather is in your favour much like our Rhino Peak ascent in 2014, then your images will have fantastic drama with big clouds and clear visibility where the landscape is a deep green. Probably the most ideal time to hike in the Berg, weather wise, is late March to mid-May
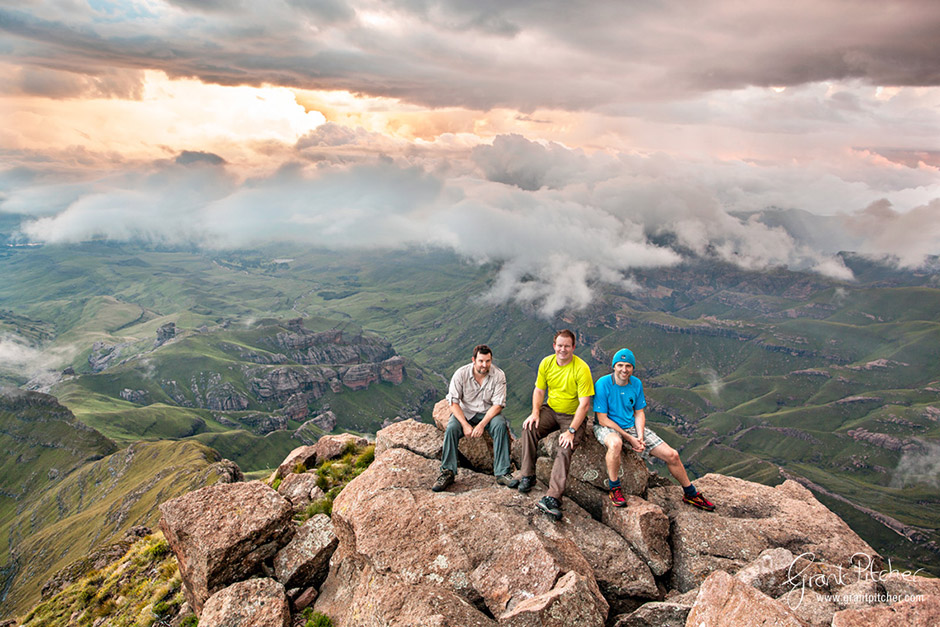
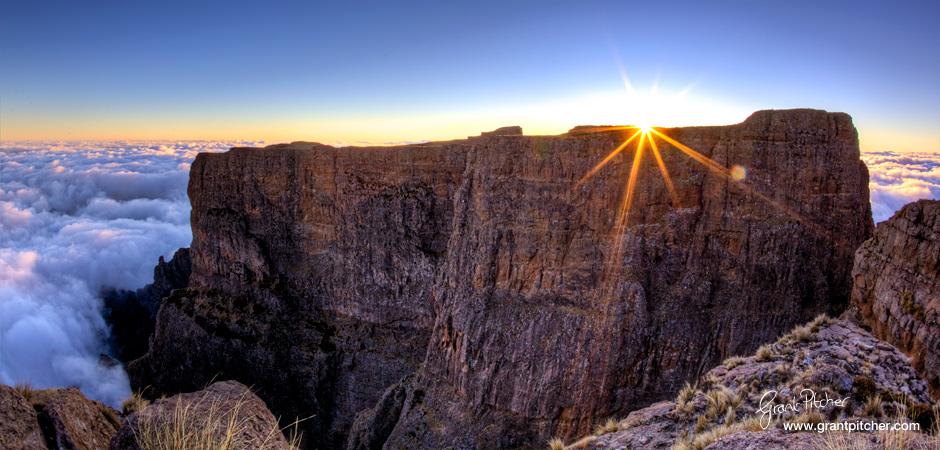
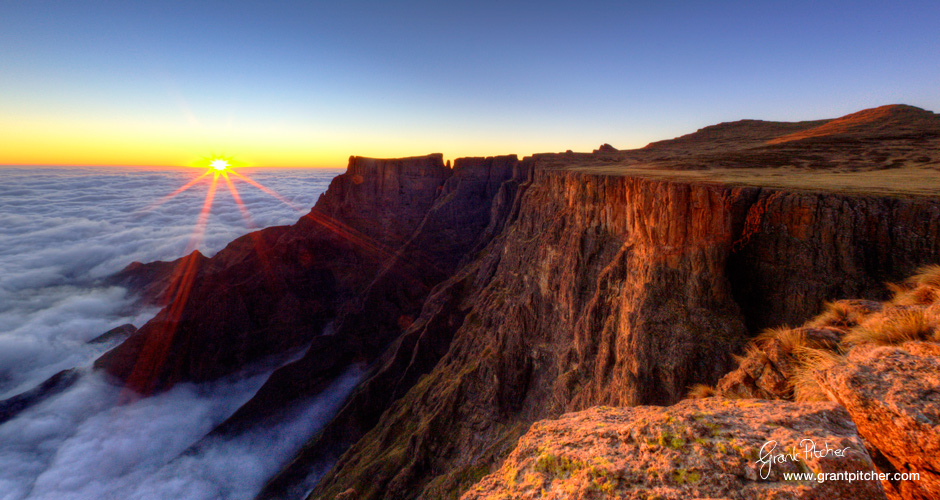
From above the clouds on the Rhino Peak, southern Drakensberg
Plan and research your route well. Get a good hiking map of the area you’re going to and get some advice online from those who have been before. I use the forum at www.vertical-endeavour.com for some great advice.
Pack light …. oh and one more thing, pack very light. When you are ascending sometimes as much as 1000m of vertical ascent in a day and you’ve loaded your pack with extra camera gear, you may need to sacrifice on other luxuries in order to keep your pack weight down. The rule of thumb is your pack should never weigh more than 25% of your body weight.
With regards the camera gear it’s worth noting that 2 lenses are very useful when I consider what images I wish to capture. The first one is the 17-40mm L series Canon lens. Yes I’m a full frame 5D III Canon user and proud of it! The wide angle lens is most versatile for capturing the big wide open expanse of the escarpment. I also take my 70-200mm F4 lens as this is great to get in close to mountain peaks, spurs or gushing waterfalls. Additionally it’s great to pull back from your fellow hikers and then zoom in to capture them in the environment. Take extra memory cards as you may need take 2 or 3 exposures of scenes to capture wide dynamic range of light that these scenes present. I also take a remote timer release for shooting the night landscape as in the winter it is so clear and when the full moon is out it is almost like daylight. The stars are amazing on the clear nights too. But don’t sleep in as there’s always a gem of a sunrise, even with the cloud around. You don’t go up that high not experience the first light of day below you!
Full moon illumination – the mountain top landscape lit up by the full moon. This image is taken 2 hours after sunset.
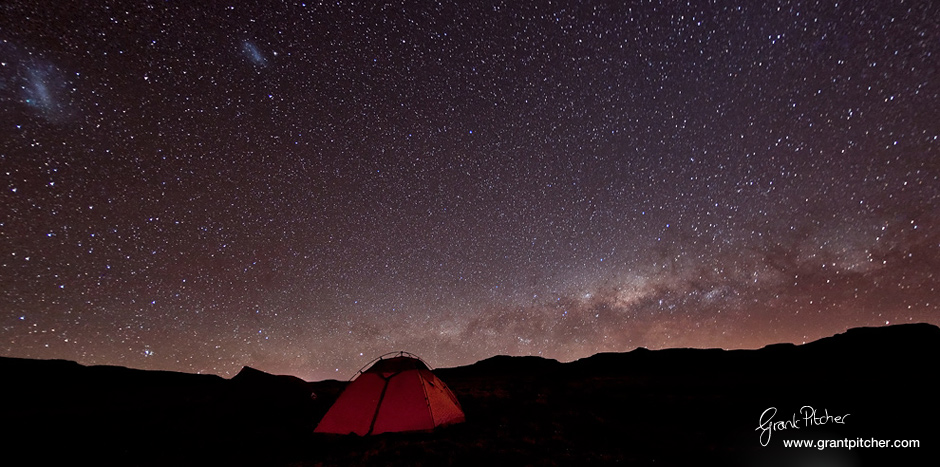
The Milky Way as if like smoke appearing from the top of the tent. Taken at 3:30am on Sunday morning with the temperature gauge reading -10C!
Some photographic points to keep in mind
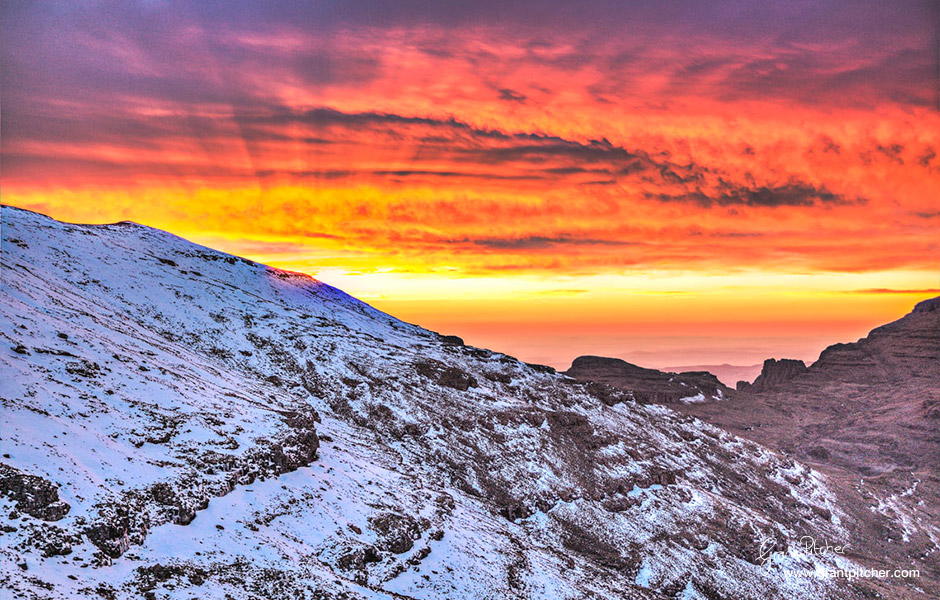
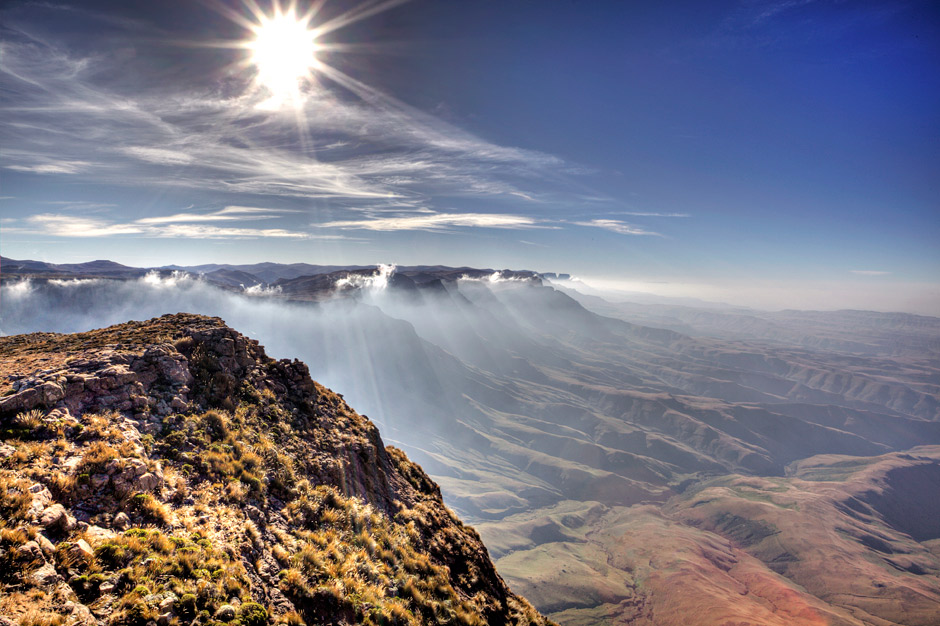
- the sun always hits the peaks first and makes them look like they are on fire in the early morning – get up early to catch this. Also when photographing into the rising sun try and capture it just star bursting over the cliffs in front of you with small aperture like F18 or smaller – it just adds more a greater dynamic to the image.
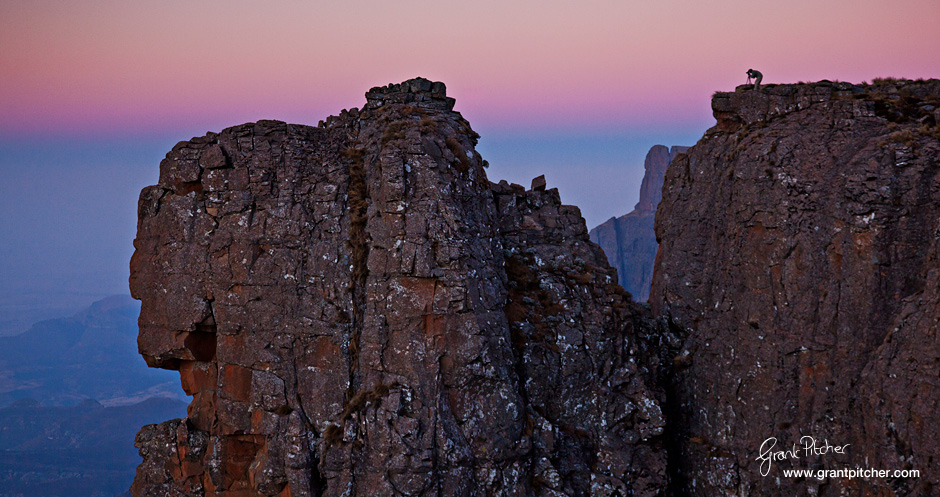
- Try often to show people in the landscape which give an idea of the scale, especially if the people are being dwarfed by the massive cliffs.
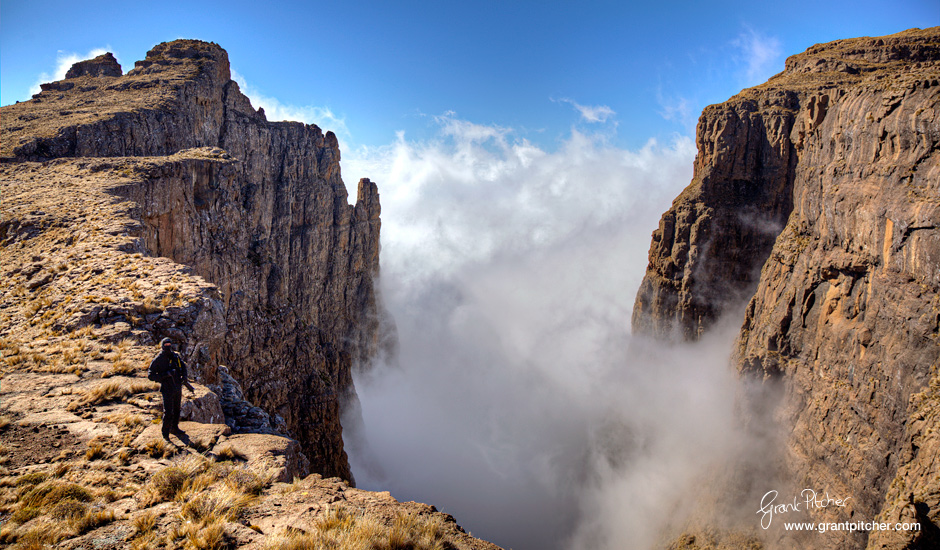
Capture the drama of the cloud as it billows in between the cutbacks. Hiker dwarfed in the scene.
- capture dramatic silhouettes of your fellow hikers
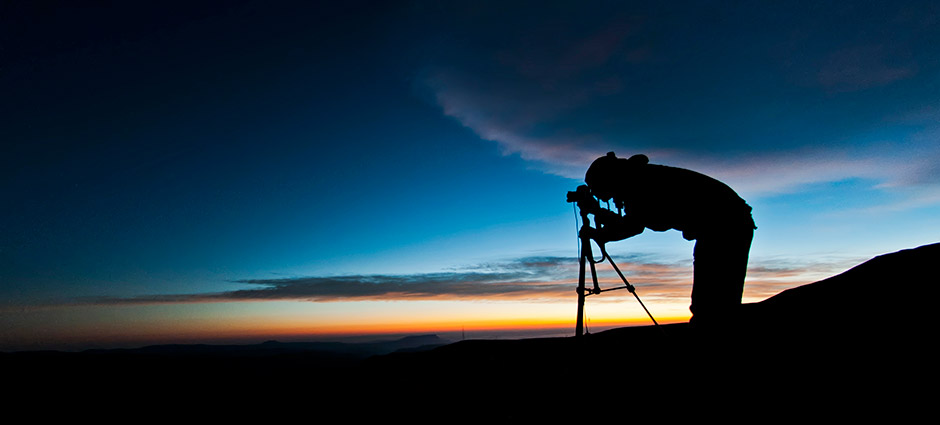
Rian catching the last colours of the sunset.
- the Amphitheatre in the Northern Berg is the most accessible region to get to the top of the escaprment and the scenery from there is just magnificent. You park your vehicle at the Sentinel carpark just above Witsieshoek Hotel. It’s only about a 3 hour hike up to the chain ladders and then a half hour to the Tugela Falls from there. Then for the more adventurous I recommend going on to Mt Amery (just past the Eastern Buttress) and on the Icidi River Valley.
Sunrise on our second morning before packing up camp and heading back down the mountain.
- another great hike for first time Bergers to ascend to the top of the escarpment is the Giants Castle Peak via Giants Ridge and on to Giants Pass. Camp your first night at the base of the pass where there’s a good flowing river throughout the year and then ascend the pass on day two. At the top of the pass head around to the left and the back of the Giant’s head where you can setup camp atop the Makaza waterfall which is one of the largest ice waterfalls in the Southern Hemisphere in winter, quite a spectacular site. You can make it all the way back down to the hotel from the top in about 5 hours on the 3rd day.
A view into the setting sun from Giant’s Peak looking north towards Cathkin Peak
- Cathedral Peak region also has some spectacular scenery but be prepared to be stretched physically in this area.
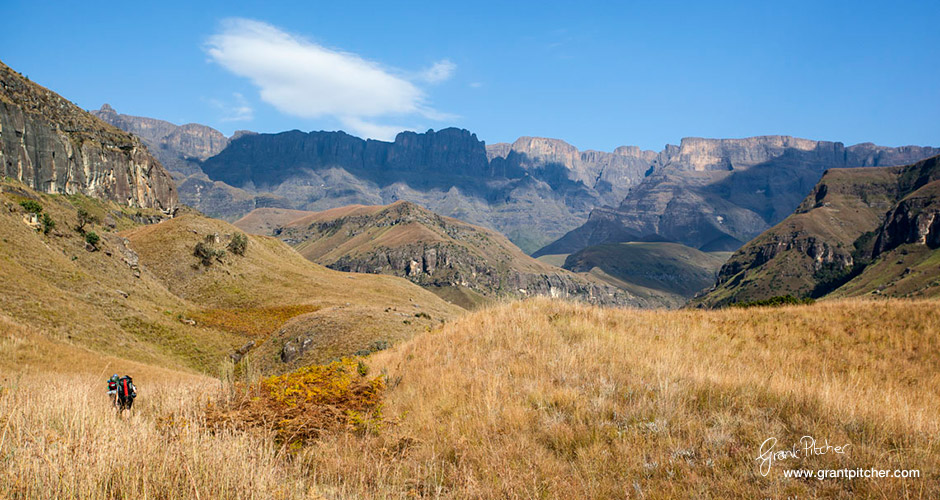
Cathedral Range in the distance looking from the Little Berg … note the hikers in the bottom left of the image always showing the scale of scenery being captured.
- For some great Little Berg scenery, I’d recommend Injesuthi and the Champagne Castle regions stretching all the way to Cathedral Peak area.
Hi Grant. Your photography and passion for it, and the outdoors, really shows on this website. It is very inspiring to see! Please keep posting! Kind regards,
Adrian Tregoning
Hi Grant we are looking to buy the image: “Sunrise on our second morning before packing up camp and heading back down the mountain.” For a corporate clients calendar.
Wonderful Warwick, it would be a pleasure. My images on this blog sell for R900 per image, supplied at A3 size.